Tag Archive for: baking

Easter is coming up soon and boy, do we have the recipe for you! Taken from the Ultimate Gluten Free, Dairy Free Collection by Grace Cheetham, feast your eyes on this gorgeous 
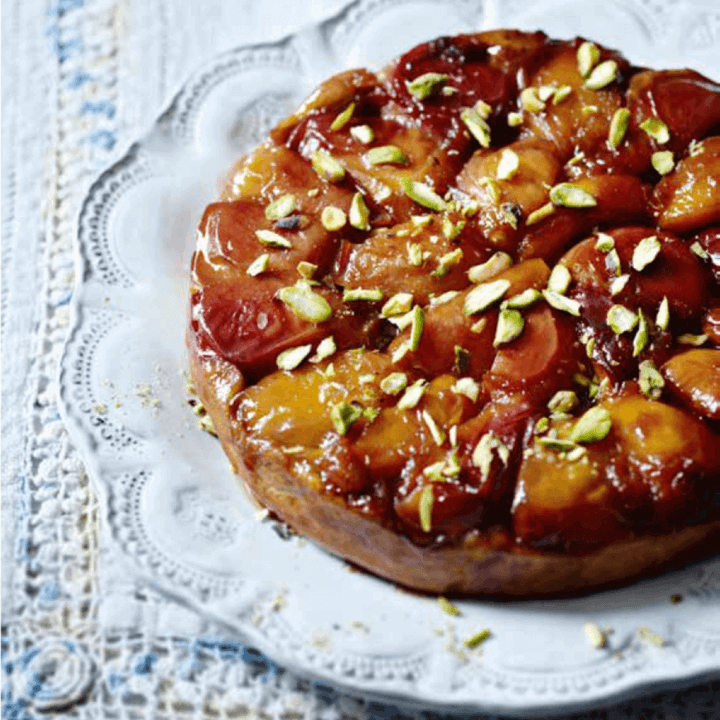
Peach & Pistachio Tarte Tatin – sweet, fresh and oh so perfect for an Easter treat!


Taken from the Ultimate Gluten Free, Dairy Free Collection


*Gluten Free – Dairy Free – Vegan

SERVES 6
PREP 10 minutes, plus making the pastry
COOK 55 minutes

Ingredients
75g/2¾oz/5 tbsp dairy free margarine
100g/3½oz/½ cup packed light brown sugar
6 peaches, stoned and quartered
unsalted pistachios, shelled and chopped, for sprinkling

Sweet Shortcrust Pastry Mix
75g/2¾oz/heaped ⅓ cup brown rice flour
40g/1½oz/scant ⅓ cup maize flour
35g/1¼oz/⅓ cup gram (chickpea) flour
1 tsp xanthan gum
50g/1¾oz/½ cup ground almonds (substitute fo 50g/1¾oz/½ cup finely ground shelled, unsalted pistachios)

Method
1 Gently heat the margarine in a 20cm/8in heavy-based oven-proof frying pan until melted. Sprinkle the sugar over, then arrange the peach quarters in the pan in one layer. Cook over a gentle heat for 20–30 minutes until the peaches are soft and golden and the liquid has caramelized. Remove from the heat.

2 Preheat the oven to 220°C/425°F/gas 7. Liberally dust a chopping board with sweet shortcrust pastry mix and, using a rolling pin, gently roll out the pastry to a round that is slightly larger than the frying pan. Be careful as the pastry will still be slightly sticky. Trim the pastry neatly into a circle with a sharp knife, then carefully lift or ease the pastry with a spatula and place it on top of the frying pan, completely covering the peaches and tucking the excess down the side of the peaches, if you need to.

3 Transfer the pan to the oven and bake for 20–25 minutes until the pastry is golden. Remove the tart from the oven and leave to cool in the pan for 2 minutes. Place a serving plate, upside down, over the top of the pan, then, holding the pan and plate together, turn them over so that the tart turns out onto the serving plate with the caramelized peaches on top. (Be very careful and use oven gloves as the pan will still be very hot.) Liberally sprinkle over the chopped pistachios. Serve warm or cold.

Very happy baking! Tag us @NourishBooks so we can see your creations!

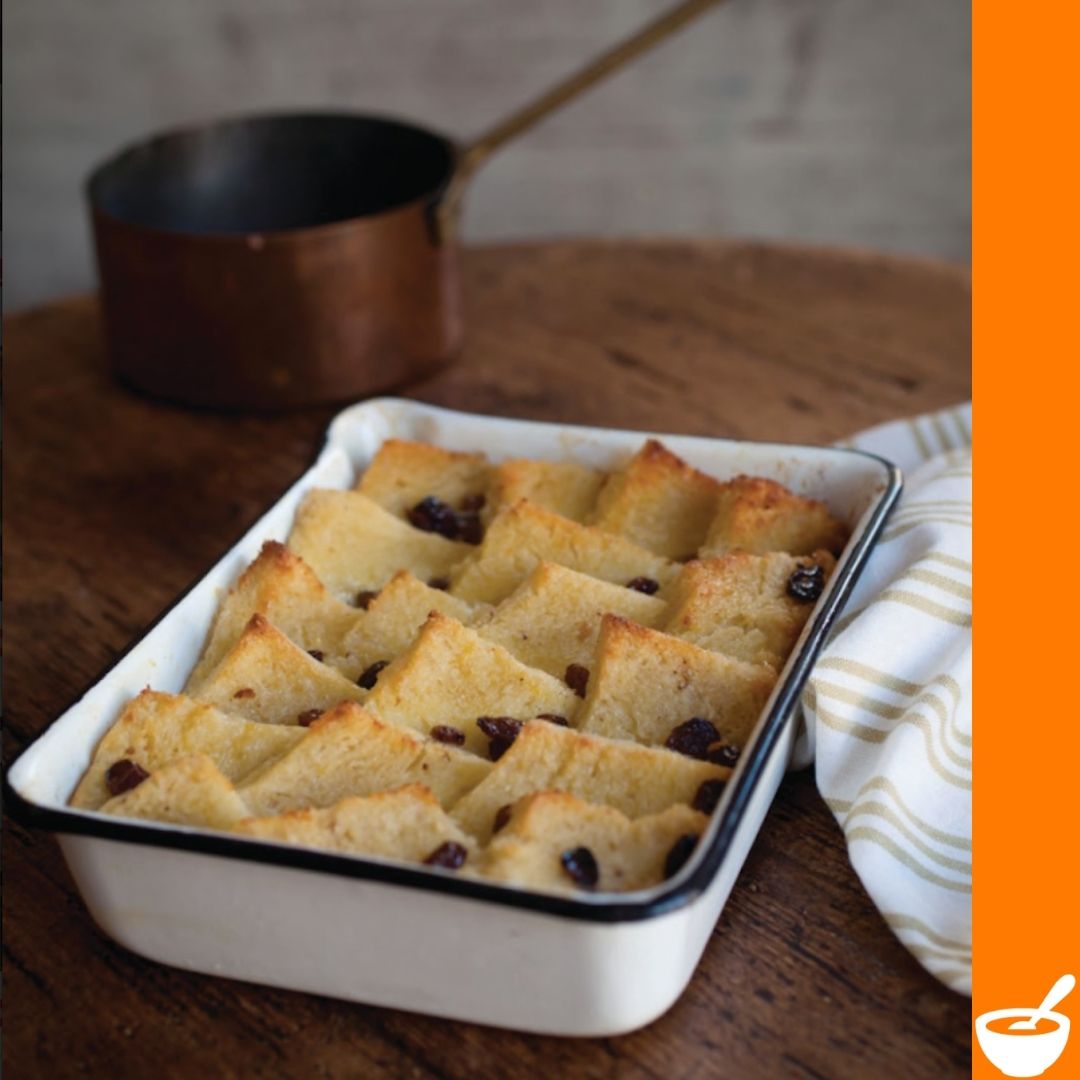
We’re sharing some bread you’ll just loaf for #RealBreadWeek!

This recipe is included in Slow Dough: Real Bread by Chris Young, it was contributed by Ursi Widemann. Here’s what she said: “I love pretzels! I could eat them every single day . . . maybe it’s because I’m Bavarian”.

Pretzels are usually dipped in a solution of sodium hydroxide (lye) prior to baking, which gives them their characteristic taste and shiny brown skin. As food-grade sodium hydroxide can be hard to obtain and is hazardous to handle, this recipe uses bicarbonate of soda/baking soda instead, which gets you safely toward a similar result.


Taken from Slow Dough: Real Bread


Makes: 12
From mixing to oven: 12–16 hours
Baking time: 15–20 minutes

Ingredients
For the pre-ferment:
125g/4½oz/¾ cup plus 2 tbsp wholemeal/wholewheat bread flour
20g/1½ tbsp rye sourdough starter
100g/3½oz/½ cup minus 1 tbsp water
For the dough:
375g/13oz/223 cups white bread flour
25g/1oz/2 tbsp butter
8g/1½ tsp fine/table salt
160g/5¾oz/23 cup water
For dipping:
1kg/2lb 4oz/4¼ cups water
20g/heaping 1½ tbsp bicarbonate of soda/baking soda
For the topping:
coarse sea salt flakes or crystals, or you could use sesame seeds, poppy seeds or caraway seeds

Method
1
Mix the pre-ferment ingredients together, cover and leave at room temperature for 8–12 hours until bubbly.
2 Mix the dough ingredients with the pre-ferment, and knead until you have a firm but supple dough: tighter than usual, but if it really is too stiff to work, add a little more water. Put the dough into a bowl, cover and leave to rise at room temperature for a further 3 hours, giving the dough a single fold halfway through this time.
3 Divide the dough into 12 equal-size pieces (65g/2¼oz), roll into balls, cover and leave for 20 minutes, then roll each piece into a strand about 25cm/10in long that tapers at the ends with a little belly in the middle. Bend each strand into a “U” shape, cross one side over the other about halfway up, give it a twist where they cross, then fold the ends up to meet the bend of the U and press down gently to fix in place. Cover the dough and leave to prove for 45–60 minutes.
4 Line a baking sheet with non-stick baking parchment and heat the oven to 230°C/210°C fan/450°F/gas 8. Meanwhile, bring the water to the boil in a large pan and add the bicarbonate of soda/baking soda. Drop the pretzels into the boiling liquid 2 or 3 at a time for 20 seconds, lift out with a slotted spoon and place onto the baking sheet. Immediately sprinkle with the topping of your choice while the dough is still tacky. Slash the dough at its fattest part and bake for 15–20 minutes until deep brown.

Happy baking! Don’t forget to tag us in your posts – #NourishBooks AND #RealBreadWeek!

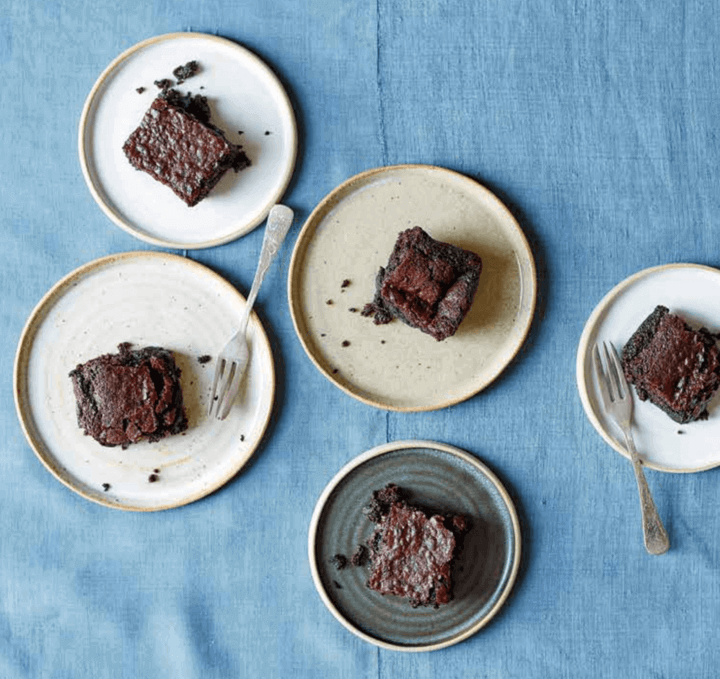
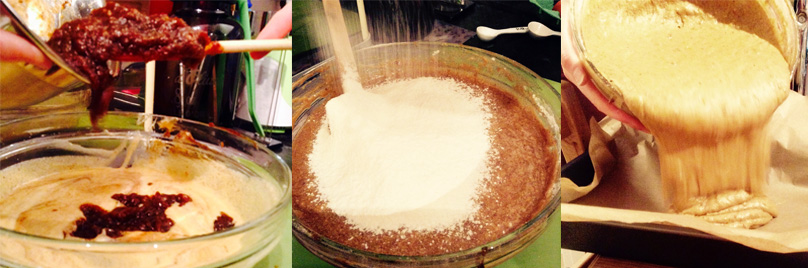
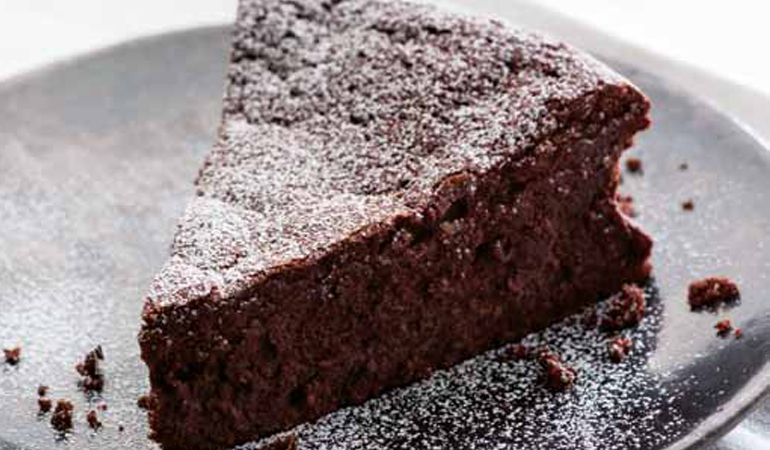
We’re keeping the #Veganuary train running with this truly necessary comfort food recipe – BROWNIES!

Quick, easy and delicious brownies from Rose Elliot’s Complete Vegan


From Rose: ‘These brownies are the result of my many attempts at making ‘the perfect vegan brownie’. For me, it’s perfect just as it is, but if you want it even more ‘fudgy’ you can simply double the amount of chocolate and bake the brownies for a few minutes longer. Either way, they are quite delicate when they first come out of the oven, but they soon firm up. In fact, they are even more delicious the next day and keep well… if they are allowed to. I hope you will enjoy them.’

Makes 15

Ingredients

100g (3½oz) plain (semisweet) vegan chocolate

100g (3½oz/scant ½ cup) vegan spread

125g (4½oz/scant ⅔ cup) soft brown sugar

4 tbsp soy or other plant-based milk

1 tsp cider vinegar or wine vinegar (red or white)

75g (2¾oz/generous ½ cup) self-raising (self-rising) flour

¼ tsp salt

¼ tsp baking powder

½ tsp bicarbonate of soda (baking soda)

Method

Preheat the oven to 170°C/340°F/gas mark 4.

Line the base and sides of a 20cm (8in) square baking tin (pan) with 2 strips of good-quality non-stick baking paper (so that the bottom has a double layer of paper).

Break the vegan chocolate into pieces and put them into a saucepan along with the vegan butter and sugar. Heat gently until melted, then remove from the heat.

Meanwhile, mix the milk with the vinegar in a bowl and set aside to curdle.

Sift the flour, salt, baking powder and bicarbonate of soda (baking soda) into the chocolate mixture and stir until well combined. Add the curdled milk and mix quickly with a wooden spoon until combined, then thump the pan on the work surface to get rid of any air bubbles. Tip the mixture into the prepared tin, spreading it to the edges, then thump the tin sharply on the surface once again.

Bake for about 20 minutes until firm.

Let cool, then cut into pieces in the tin. The brownies become firmer and fudgier as they cool. They keep well stored in a tin.

Happy #Veganuary baking everyone! These brownies hit the spot every time, forgoing meat shouldn’t mean you forgo your favourite foods – especially in a time when everyone deserves some comfort food ❤️ 

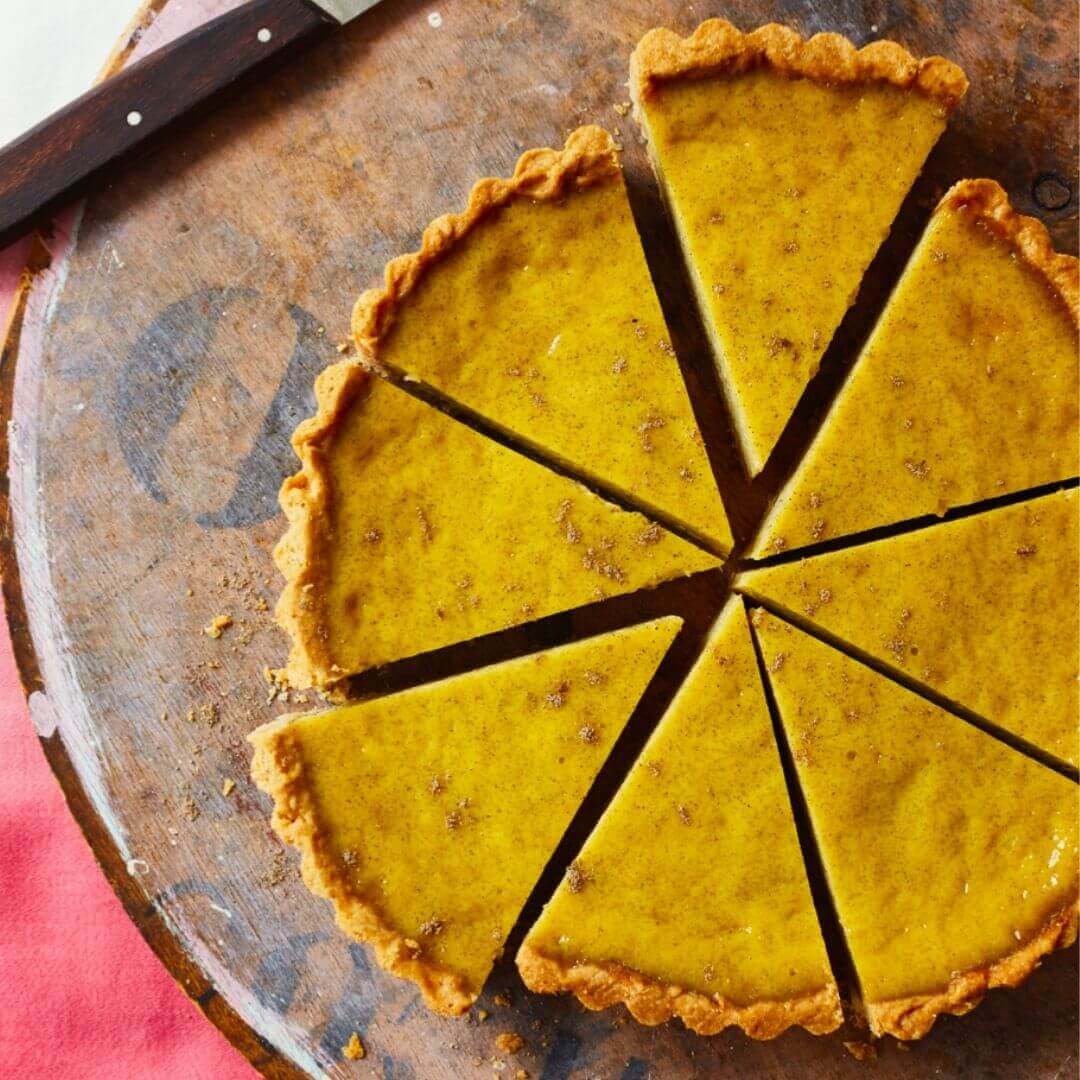
This season of The Great British Bake Off might be over but (!) we’re still feeling the ache to bake! Also, you know, who doesn’t need cake on a Tuesday afternoon? We’re going for this decadent Cardamom Custard Tart from crowd favourite Mowgli Street Food by Nisha Katona, it’s one for the ages.

        Cardamom Custard Tart from Mowgli Street Food


From Nisha: ‘This is such a great variation on the comfort food of our grandmothers’ generation. Cardamom works tremendously well in any dishes that are milk based; the aromatic oils in the spice seem to bring custards alive. The other spices you need to play with – omit or enhance as your taste demands – but it is the sprinkle of cardamom at the end that wakes the pudding up in eastern climes.’


Ingredients

For the pastry:

145g/5oz/generous ½ cup cold unsalted butter, cut into small cubes

250g/9oz/1⅔ cups plain/all-purpose flour

¼ tsp ground cloves

⅛ tsp ground ginger

¼ tsp ground cinnamon

¼ tsp nutmeg

110g/3¾oz/½ cup caster/granulated sugar

1 egg, beaten

1 tbsp full-cream/whole milk

For the custard:

250ml/9fl oz/1 cup double/heavy cream

250ml/9fl oz/1 cup full-cream/ whole milk

1 vanilla pod/bean, split

8 large egg yolks

100g/3½oz/scant ½ cup caster/granulated sugar

2 green cardamom pods, crushed

2.5cm/1 inch piece of fresh root ginger, peeled

1 whole nutmeg

1 clove

2 black peppercorns

1 small bay leaf

3 sprigs of fresh thyme

¼ tsp rosewater

⅛ tsp ground turmeric

1 tbsp ground cardamom, plus extra to sprinkle


Method

  1. Start by making the pastry. Rub the cold butter into the flour and ground spices with your fingertips until it starts to resemble breadcrumbs. Add the sugar, egg and milk and gently bring together until it forms a smooth dough.
  2. 2  Lightly flour your work surface and roll the pastry out to a thickness of 3–4mm/⅛–¼ inch, then line a 20cm/8 inch tart pan, leaving about 3cm/11⁄4 inches of pastry overhanging the edge of the pan. Refrigerate for 30 minutes.
  3. Preheat your oven to 180°C/350°F/gas 4. Take your pastry case out of the refrigerator, prick all over with a fork and line with baking parchment, then fill with baking beads. Blind bake for 20 minutes, then remove the baking beads and parchment and bake for a further 15 minutes or until it is golden brown. Remove from the oven and lower the temperature to 140°C/275°F/gas 1.
  4. To make the custard, put the cream, milk and vanilla pod in a medium saucepan set over a medium heat and bring up to the boil. In a mixing bowl, beat the egg yolks with the sugar until pale white, then pour a little of the hot cream mixture over the egg yolks and mix well. Pour this back into the saucepan, then add the rest of the custard ingredients. Reduce the heat to low and cook, stirring continuously, for a further 5 minutes. Strain the custard into a pouring jug and skim off any froth or bubbles.
  5. Carefully pour the custard into the case, then place the tart case on a shelf in the middle of your oven. Bake for 40–45 minutes or until just set – there should still be a slight wobble to the custard as it’s removed from the oven.
  6. Trim off the overhanging edges, then leave to cool completely. Finish with a sprinkle of ground cardamom just before serving.

Happy baking! Tag us (@NourishBooks, #NourishBooks) on social media, we’d love to see your creations.

We’re celebrating the return of the Great British Bake Off with this delicious recipe for Masala Chai-spiced Bread and Butter Pudding from Slow Dough: Real Bread by Chris Young! Read on for the full, spicy and satisfying recipe!


Masala Chai-spiced Bread and Butter Pudding taken from Slow Dough: Real Bread.

SERVES: 4-6

PREPARATION TIME: 45-55 minutes

COOKING TIME: 30-40 minutes

Ingredients

FOR THE CUSTARD:

600g/11b 5oz/XXX cups milk (or a mixture of milk and cream)

1 green cardamom pod

1 or 2 cloves

1 slice (about 3mm/1/8 inch thick) fresh ginger

2cm/3/4 inch piece of cinnamon quill or cassia bark

1 vanilla pod/bean

a twist or two of black pepper

50g/194ozl/4 cups caster/superfine sugar

2 eggs

300g/10 and a 1/2 oz stale Real Bread, sliced about 1cm/1/2 inch thick

50g/1 and 3/4 0z/3 and 1/2 tbsp butter

zest of half a lemon

50g/1 and 3/4 oz/1/2cup seedless raisins or sultanas/golden raisins

Method

  1. Measure the milk into a saucepan, add the spices, vanilla and pepper, and heat but do not boil. Cover and set aside to cool and infuse.
  2. Grease an ovenproof dish. Butter the bread on one side and arrange half of the slices in a layer in the dish. Scatter the lemon zest and raisins over the bread and layer the rest of the bread on top. If you are using a smaller, deeper dish, you might get three layers of bread and two of fruit.
  3. Strain the spices out of the milk. Split the vanilla pod lengthways and scrape the seeds back into the milk (dry the vanilla pod to use again, or to flavour a jar of sugar.
  4. Whisk together the sugar and eggs, then add the milk and whisk again. Pour the custard over the bread, butter and fruit in the dish – it should reach about half way up the top layer of bread. Press the bread down into the mixture (you don’t want any dry bits) and leave to soak for about 30 minutes.
  5. Heat the oven to 180°C/160°C fan/350°F/gas 4. Put the pudding in the oven and bake for 30-40 minutes until brown on top and just set in the middle – wobbly, not watery. Serve warm or cold with cream or custard.

Happy Baking! Why not upload a #SourdoughSelfie tag @RealBreadCampaign and @NourishBooks on Instagram!

In honour of this very #HappyMonday we thought we’d share a special Middle-Eastern inspired recipe taken from Fire and Spice by John Gregory-Smith! Are you ready to bake some Dark Chocolate, Clove & Cinnamon Brownies?

Dark Chocolate, Clove & Cinnamon Brownies

Makes 16

Ready in 40 minutes, plus resting

Ingredients

250g/9oz unsalted butter, plus extra for greasing

300g/10 and a 1⁄2oz chocolate with 70–80% cocoa, plus extra to serve

125g/4 and a 1⁄2oz/heaped 1⁄2 cup caster (superfine) sugar

125g/4 and a 1⁄2oz/2⁄3 cup light muscovado sugar

3 eggs and 1 egg yolk, beaten

100g/3 and a 1⁄2oz/1 cup pecan nuts, crushed

60g/2 and a 1⁄4oz/1⁄2 cup plain (all-purpose) flour

1 tsp baking powder

1 tsp sea salt

60g/2 and a 1⁄4oz/scant 1⁄2 cup cocoa powder, plus extra to serve

1⁄4 tsp ground cloves

1⁄2 tsp ground cinnamon, plus extra to serve

Method

1 Preheat the oven to 180 ̊C/350 ̊F/Gas 4. Grease the bottom and sides of a 23cm/9in square cake tin, then line with baking parchment.

2 Break the chocolate into pieces and melt in a heatproof bowl set over a saucepan of barely simmering water. Make sure the bottom of the bowl doesn’t touch the water. Once completely melted set aside to cool slightly.

3 Put the butter, caster (superfine) sugar and muscovado sugar into a food processor and blend on a high setting for about 5 minutes, or until they form a smooth paste.

4 Slowly add the eggs, a little at a time, to the butter and sugar mixture and blend on a low setting until everything is incorporated. Give the mixture a final blast on a high setting for 30 seconds, then transfer to a large mixing bowl.

5 Slowly fold in the melted chocolate, then add the nuts and sift in the flour, baking powder, salt, cocoa powder, cloves and cinnamon. Fold everything together using a large metal spoon, then scrape the batter into the prepared cake tin. Smooth the top with a palette knife and bake for 20–30 minutes, or until soft and gooey in the middle and just cracking on the top and sides. To test if the brownie is ready, insert a skewer into the centre pushing right to the bottom. It should come out with a little of the yummy, goey brownie clinging but not totally coating it. If the skewer is completely coated, put the brownie back in the oven and test it again every 3 minutes until cooked.

6 Remove from the oven and leave to cool for 30 minutes in the cake tin. Flip the brownie out of the tin onto a chopping board, peel off the baking parchment and cut into squares. Serve hot, warm or cold with a generous sprinkling of cocoa powder and a sprinkling of cinnamon, to taste.

Happy Baking! And don’t forget to tag @NourishBooks on Instagram!


EmmaOur Export and UK Sales Executive Emma loves baking from Gee Charman’s Guilt-Free Baking, and sharing her cakes with us in the office. We can’t wait to try her sweets, that normally don’t last more than five minutes, and also become a good opportunity to have a little chat during a busy day. And all guilt-free! This time Emma surprised us with a Sticky Toffee Tray Bake, and it was truly delicious. You can follow Emma on Instagram.

My favourite baking book at the moment is Guilt Free Baking and that’s not because I’m slightly biased, but because everything I’ve baked from it so far has been delicious! I’m no baking whizz but I do love the exactness of baking – follow the recipe, how can you possibly go wrong? So I saw the sticky toffee tray bake recipe whilst browsing this book (for maybe the hundredth time) and had to give it a go. It’s particularly great for sharing in the office (maybe), and easy to transport. Perfect!

guilt-free baking

Firstly pre-heat your oven. I always forget and have to wait… 180/350/Gas mark 4. Also prepare your tray. I used a 12 x 8 inch tray, but you could easily use a couple of smaller ones and be creative with your portion sizes.

The thing I liked about the recipe is that there are not hundreds of complicated or expensive ingredients to buy. They’re all ingredients that you would have in your kitchen, with very little buying needed. If you have a food processor, the next part is easy. I realised a little late on that our hand blender at home wasn’t going to make this a simple step. But in the face of this challenge, I persevered and managed to blend the dates to within an inch of their datey life. With the dates, add the vanilla coffee essence and the bicarbonate of soda. I found adding the warm water helped with my lack of food processor as I pulverised them into a smooth puree.

Guilt Free baking

Next the butter and sugar is beaten together in a separate bowl until it’s light and creamy. Add the eggs one at a time so as not to curdle your mix. Once these are in, it’s time to add the date mixture. Now, this next bit is a delicate affair so please be patient with this otherwise you will end up with scrambled egg. I’ve not tried egg and toffee pudding before, maybe it’s the next thing, but I didn’t feel it was appropriate to share this with the team. Add the mixture in little by little folding gently, and finally fold in the flour.

Guit free baking 2

Now you have everything combined, add this to your tin(s) and bake for 30 minutes until a skewer or kitchen knife inserted into the middle comes out clean. Leave this to cool in the tin for now, or if you’re particularly brave (impatient) you could take it out and leave to cool on a rack so it cools quicker.

Whilst waiting patiently for the bake to cool, you can make the sauce. It is both easy to make and delicious. Pour the condensed milk, sugar and butter into a saucepan and gently melt it together for a few minutes until it starts to turn darker brown and thickens up.

This isn’t in the directions, but I cut the bake before pouring over the sticky toffee mixture. There’s guidance for portions per recipe, which gives you an idea of your calorie intake if you stick to it. Though to be honest when you’ve made many of these recipes, calories fly out the window! I found that having pre-sliced the bake, the toffee went everywhere. In my opinion, this is a GOOD thing!

FullSizeRender_14

The photos are courtesy of my glamorous assistant, and partner Maria who had first choice on which square to have first. Again, the recipe doesn’t say this but we had a (small) spoon of cream on the side. I’ve had several sticky toffee puddings but this definitely went down as one of the more delicious versions. You’ll be pleased to know that this will keep for up to five days if you have an air tight container to store it in. Though to be honest if you work in an office like ours, any sweet treat won’t last more than five minutes!

Ingredients:
350g/12oz/2 cups pitted dates
2 tsp vanilla extract
4 tbsp coffee essence
2 tsp bicarbonate of soda
75g/2½oz butter, softened
200g/7oz/heaped ¾ cup caster sugar
4 eggs
400g/14oz/3¼ cups self-raising flour

For the sauce:
150ml/5fl oz/scant ⅔ cup light condensed milk
100g/3½oz/heaped ½ cup dark soft brown sugar
50g/1¾oz butter

51bqP28OCqL._SX387_BO1,204,203,200_

Gee Charman
Guilt-Free Baking
Available from Nourish in August 2015


Sign up for our newsletter to get our new articles straight to your inbox every month.

There is nothing more wonderful than the aroma of freshly baked cakes and biscuits. Baking really is a very simple skill to master and requires only a light touch and good-quality, fresh ingredients. Get ready to celebrate the chocolate cake day on January 27th with a delicious Flourless Chocolate & Citrus Cake. To know more about chocolate and be guided through a range of delicious chocolate recipes, take a look at Chocolate by Jennifer Donovan.

Chocolate.pdf - Adobe Acrobat Pro

Preparation time: 25 minutes
Cooking time: 45–5O minutes
Makes: 1 x 23cm/9in cake

Ingredients:
175g/6oz butter, melted and left to cool, plus extra for greasing
6 eggs, separated
200g/7oz/¾ cup plus 2 tbsp caster sugar
zest of 1 orange, finely grated
zest of 1 lemon, finely grated
125ml/4fl oz/½ cup orange juice
125g/4½oz/1¼ cups ground almonds
2 tbsp cocoa powder
250g/9oz dark chocolate, melted and left to cool icing sugar, sifted, for dusting

Method:

  •  Preheat the oven to 180˚C/350˚F/gas 4. Grease a deep 23cm/9in spring-form round cake tin with butter, and line the base with baking paper.
  • In a large bowl, beat the egg yolks, sugar, orange and lemon zest together until thick and pale, using an electric hand mixer. Stir in the melted butter and the orange juice. In a clean bowl, combine the ground almonds and cocoa, then fold into the egg mixture. In a clean bowl, whisk the egg whites to soft peaks, using clean attachments for the electric hand mixer, then pour in the melted chocolate and stir together. Fold into the cake mixture until just combined, using a metal spoon, then pour into the prepared tin.
  • Bake in the hot oven for 45–50 minutes, or until the cake is firm around the edges but still slightly soft in the middle. Remove from the oven and leave the cake in the tin to cool completely, then remove the cake from the tin and dust with icing sugar.

chocolate_minijkt_UK-300x454

Jennifer Donovan
Chocolate
Available from Nourish Books
£9.99


Grace Cheetham is the author of the internationally acclaimed The Best Gluten‐Free, Wheat‐Free &  Dairy‐Free Recipes and Untitled-1Simply Gluten‐Free & Dairy‐Free. Passionate about great food and allergy‐free living, she runs a website and a blog ‐ www.glutendairyfree.co.uk that has been voted one of the best gluten‐free and allergy‐friendly blogs by Channel4.com’s 4Food and one of the 100 best food blogs by womanandhome.com. Grace judges at the Great Taste Awards and Free‐From Food Awards and runs cookery demonstrations and classes.

Can you describe your book? What should the reader expect from it?
I’m so excited about this book. It’s the culmination of so many years of baking (my basic bread recipe, alone, took about 60 goes to get it absolutely perfect). And it’s jam-packed with treats and indulgences. From an amazing Sourdough Bread to Cinnamon Brioche Buns, from moreish Fennel Crackers to Millionaire’s Shortbread, from delicate Fondant Fancies to Chocolate & Beetroot Cake, from a show-stopper Crab & Dill Tart to Beef Wellington, or from delicious Lemon Tart to Passion Fruit & Coconut Cheesecake, there’s everything and, hopefully, more…

When did your passion for gluten-free cooking begin?
I grew up on free-from food. When I was young, the ingredients that were available were generally very restricted but now there’s such a wonderful array of different ingredients to choose from, and to experiment with. I started with fairly simple recipes but then, as more ingredients came onto the shelves, I tried more and more things. My favourite culinary moment from this book, I think, was when I made the Chocolate Profiteroles. They worked first time – and are heavenly. And you simply can’t tell that they’re gluten-free. It was the first time I’d had profiteroles for many, many years. Bliss!

What was the biggest challenge in writing The Best Gluten-Free and Dairy-Free Baking Recipes?
My biggest challenge, I think, was not eating all the cake! All over the summer months that I wrote the book, I invited friends and neighbours around to taste the bakes. I have a lovely memory of one sunny summer afternoon when we had five families – with all the adults sitting eating cake, cookies and cheesecake and drinking wine – and all the kids running around the garden.

What was the first gluten-free dish that you mastered?
Flourless Chocolate Cake, I think. And it taught me one hugely important lesson – the importance of beating or whisking cake ingredients really, really well, to get as much air as possible into the mixture. It makes all the difference to the end result.

What is the best gluten-free recipe to get started?
Try something that you really love. Maybe pizza or maybe chocolate brownies. Follow the recipe exactly, regardless of things like whether the mixture seems too runny compared to traditional baking. Put it in the oven, sit back and enjoy the anticipation!

What is the kitchen tool that is absolutely necessary for a gluten-free baking?
Probably kitchen scales or proper measuring cups. The balance of flours, in particular, is really important in gluten-free baking.

Can you tell us 3 kitchen hacks for a gluten free diet?
– Make up large batches of flour mixes. In this book, there are different flour mixes for Cakes, Biscuits, Breads and different types of Pastry. Different balances of types of flour plus grain/starch balances make a massive difference to the end result. And instead of making up the mixes every time you bake, it’s good to make up large batches and store them, ready for when you feel like baking.
– Keep your store cupboard and freezer stocked, especially with things like gluten-free breadcrumbs that you can keep in the freezer and use to coat chicken or fish from frozen.
– Share the dishes with your friends and family, rather than cooking/eating separate meals. It’s much more fun!

index
Grace Cheetham
The Best Gluten-Free and Dairy-Free Baking Recipes
ISBN: 9781848991996
Available from Nourish Books